Quick Answer: To sew an invisible zipper, press the coil open with a cool iron, then stitch each side face-down onto the right side of your fabric using an invisible zipper foot. Close the remaining seam below the zipper with a regular zipper foot. With the right foot attached, it’s honestly easier than a lapped zipper.
Learning how to sew an invisible zipper is one of those skills that feels intimidating right up until the moment it clicks — and then you wonder why you avoided it for so long. Most dress and skirt patterns call for one, so you can’t sidestep it forever. The good news: the technique is straightforward, and almost every failure traces back to just two mistakes — skipping the coil-pressing step and using the wrong presser foot. Nail those two things and you’re most of the way there.
The 9 Steps at a Glance
- Press the zipper coil open with a cool iron
- Finish your seam allowances
- Mark the seamline, top stop, and bottom stop
- Clip the zipper face-down on the right side of piece one
- Sew the first side, top to bottom, using the invisible zipper foot
- Sew the second side the same way
- Switch to a regular zipper foot and close the seam below the zipper
- Tack the tape ends to the seam allowance
- Press from the wrong side with a press cloth
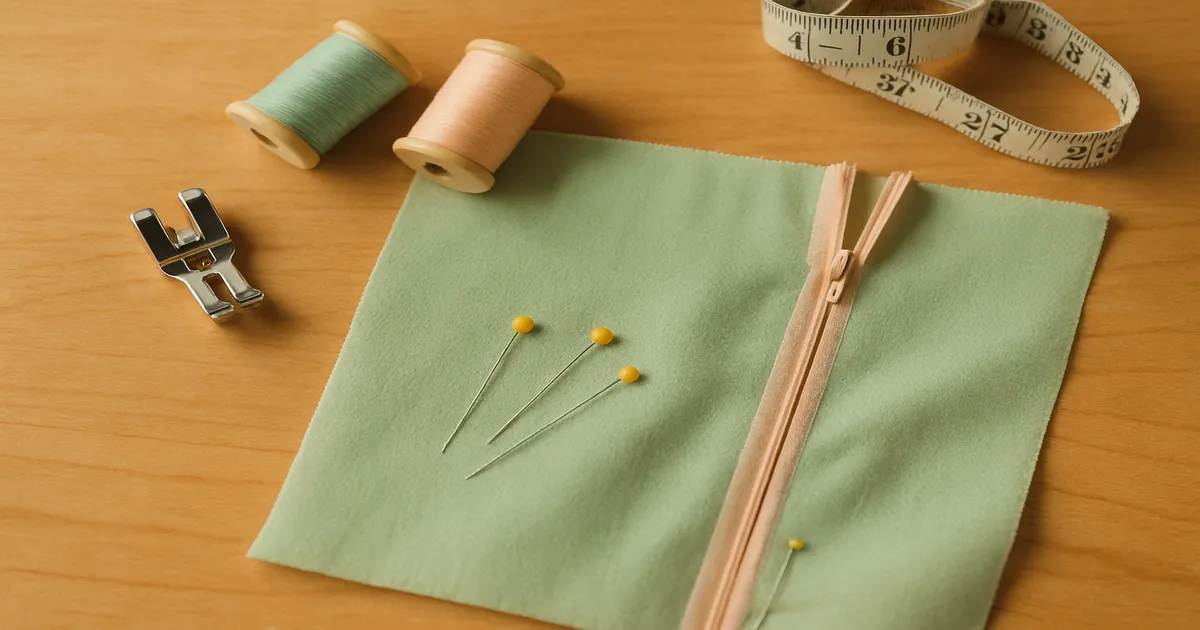
Tools and Materials You Need
Choosing the Right Invisible Zipper
Buy a nylon coil invisible zipper — not a standard zipper, not a metal one. YKK is the brand I always reach for; their coil spacing is consistent and the pull operates smoothly. Cheap no-name zippers often have irregular coil spacing that causes skipped stitches right where you least want them.
For length, buy 1–2 inches (2.5–5 cm) longer than your opening. You’ll trim the excess after installation, and having that extra length keeps the pull above the presser foot while you sew — which means you can stitch further down the tape without stopping to move the pull out of the way. Common lengths are 9 in (23 cm), 12 in (30 cm), and 14 in (36 cm), but for a full dress back opening you’ll often need 22 in (56 cm).
The Invisible Zipper Foot: Your Most Important Tool
This foot has two grooves on its underside that hold the coil upright as you sew, letting the needle get within 1–2 mm of the coil’s base. Without it, you simply can’t sew an invisible zipper properly — a standard zipper foot won’t hold the coil in position. Generic versions run $5–$15 and fit most machines. Bernina users specifically want the #35 foot. Before you order, check whether your machine takes a low shank, high shank, or slant shank.
You’ll also need a regular zipper foot for closing the seam below the zipper.
Needles, Thread, and Notions
Match your needle to your fabric:
- 70/10 or 75/11 for sheers and silk
- 80/12 for medium weights (cotton, linen, crepe, ponte)
- 90/14 for heavier fabrics
Use a universal needle for wovens, ballpoint or stretch for knits, microtex for tightly woven fabrics or silk. Always start with a fresh needle — a dull one causes skipped stitches right at the coil, which is the worst possible place for them.
For thread, all-purpose polyester (40/2 or 50/2) works for most fabrics. For silk charmeuse or chiffon, silk thread has less drag and is worth the extra cost. Match your thread to the fabric, not to the zipper tape.
Other things you’ll want nearby: seam ripper (plan for it), fabric clips, tailor’s chalk or a water-soluble marker, a pressing ham, a press cloth, and a seam gauge.
Fabric and Interfacing Considerations
Before the zipper goes anywhere near your machine, apply a 1-inch (2.5 cm) wide strip of lightweight fusible interfacing to the wrong side of each seam allowance in the zipper area. This is non-negotiable on bias-cut seams or anything with stretch — it stops the seam allowance from distorting while you sew. For knits, use knit interfacing or stay tape instead of woven fusible.
How to Prepare Before You Sew
Finish Your Seam Allowances First
Serge, zigzag, or Hong Kong-finish both seam allowances before the zipper comes anywhere near your machine. Trying to finish them afterward is awkward and can distort the tape. Do it first, press everything flat, then you’re ready.
How to Press the Zipper Coil Open
This is the step most people skip, and it’s the number-one reason invisible zippers fail. The coil naturally curls toward the back of the tape — you need to uncurl it so it stands perpendicular to the tape before sewing.
Set your iron to a low synthetic setting with no steam. Run the iron gently along the coil only, pressing the teeth away from the tape. The coil will start re-curling within a few minutes of handling, so press it immediately before you sit down at the machine — not ten minutes earlier while you go make tea.
Marking the Seamline and Stop Points
On both fabric pieces (right side up), mark:
- The seamline: typically ⅝ in (1.6 cm) from the raw edge
- The top stop: usually ¾ in (2 cm) down from the top cut edge, to allow for a waistband or facing
- The bottom stop: ½ in (1.3 cm) above where the regular seam will begin
How to Sew an Invisible Zipper: Step by Step
Step 1: Position the Zipper on the First Fabric Piece
With the zipper fully open, place it face-down on the right side of the first fabric piece. Align the tape edge with the raw edge of the fabric, coil sitting directly on the seamline, top stop aligned with your top mark. Use fabric clips rather than pins — pins distort the tape.
Step 2: Sew the First Side
Attach your invisible zipper foot. Feed the uncurled coil into the right-hand groove of the foot. Stitch from the top downward at a 2.0–2.5 mm stitch length, letting the foot guide the coil upright as you go. Stop about 1 in (2.5 cm) from the bottom stop — you’ll hit the pull and physically can’t go further anyway. Backstitch to secure.
Step 3: Position and Sew the Second Side
Close the zipper and check alignment. Then open it again, place the second tape face-down on the right side of the second piece, matching seamlines carefully. Feed the coil into the left-hand groove this time. Sew top to bottom the same way, stopping at the same point. Backstitch.
Step 4: Close the Remaining Seam Below the Zipper
Switch to your regular zipper foot. Bring the two fabric pieces right sides together and pin the seam below the zipper. Start stitching as close as possible to where the zipper stitching ended — within 1–2 mm ideally. This is what prevents the gap. Sew the rest of the seam at your normal seam allowance and press open.
If you still get a small gap at the bottom: bridge it with a hand backstitch using a double strand of matching thread, working from the wrong side. It’s invisible from the right side and takes about 30 seconds.
Step 5: Secure the Tape Ends and Press
Tack the bottom of each tape to the seam allowance only — not through to the right side. A few hand stitches or a short machine stitch is fine. This keeps the pull from drooping and the tape from flopping around inside the garment.
If you’re attaching a waistband or facing, that seam will enclose the top of the tape. If not, hand-stitch the tape ends to the seam allowance and trim any excess tape to ½ in (1.3 cm) above the top seamline.
Press from the wrong side with a press cloth. From the right side, the seam should look completely continuous — no stitching line, no ridge, no gap.
Common Mistakes and How to Fix Them
Skipping the coil-pressing step. The coil stays curled, the foot can’t grip it, and the stitching lands too far from the coil base. From the right side, you’ll see a visible ridge — it looks like a regular zipper, which defeats the whole point. Fix: press the coil every single time, right before you sew.
Using the wrong presser foot. A standard zipper foot can’t hold the coil upright, so you end up stitching on top of it or way off to the side. The zipper won’t lie flat no matter what you do afterward. Fix: get an invisible zipper foot. It costs a few dollars and it’s the only thing that makes this technique actually work.
Stitching too far from the coil. A visible lip or ridge appears on the right side. If your coil is properly uncurled and loaded into the foot’s groove, the foot handles this automatically — the needle should pass within 1–2 mm of the coil base.
Leaving a gap at the bottom. A small triangular gap or pucker where the zipper ends and the seam begins. Start your closing seam stitch as close as physically possible to the last zipper stitch, and use the hand-backstitch bridge trick if a small gap remains.
Misaligning the two sides. The zipper pulls to one side, or a horizontal seam doesn’t match across the zipper. After sewing the first side, close the zipper and check alignment before touching the second side. Pin any horizontal seams to match precisely.
Heat damage, wrong zipper length, unstabilised seams. Too much heat melts nylon coil teeth — always use a cool iron and a press cloth, never press directly on the coil. Cutting the zipper to the exact opening length puts the pull right at the top edge, making it hard to operate; always buy longer and trim. And on a bias-cut or stretchy seam without interfacing, the seam allowance will stretch and wave during sewing — that fusible strip is doing real work.
Pro Tips for a Perfect Result
Test on scrap fabric first. I do this every single time, even on projects I’ve done a hundred times. Zipper behaviour genuinely varies by fabric weight and finish — chiffon behaves completely differently from ponte, and your settings should reflect that.
Try the basting trick for slippery fabrics. Machine-baste the entire seam closed at a 4–5 mm stitch length, press the seam open, and use that pressed crease as your placement guide when positioning the zipper. Remove the basting once the zipper is in. It makes placement much more reliable on anything that shifts around.
Tape-edge method vs. seamline method. Most tutorials tell you to align the tape edge with the raw fabric edge — this works perfectly for standard ⅝ in (1.6 cm) seam allowances. Some sewers prefer to align the coil directly on the seamline instead, which gives more control on narrow seam allowances or unusual fabric thicknesses. Both work; try both and see which gives you cleaner results on your machine.
For tricky fabrics: On sheers, use a 70/10 needle and silk thread, and consider a French seam on the section below the zipper. On knits, use a stretch needle, stabilise the seam allowance with stay tape or knit interfacing, and sew with a very slight zigzag (width 0.5, length 2.0). On bias cuts, the fusible interfacing strip is non-negotiable — without it, the seam stretches as you sew and you’ll end up with a wavy, distorted zipper that no amount of pressing will fix.
Frequently Asked Questions
Can I sew an invisible zipper without a special foot?
Technically yes, but the results will be noticeably worse. Without the grooves that hold the coil upright, you can’t get the needle close enough to the coil base, and you’ll end up with a visible ridge on the right side. An invisible zipper foot costs $5–$15 and is genuinely the tool that makes this technique work.
Why does my invisible zipper show a ridge on the right side?
Almost always it’s one of two things: the coil wasn’t pressed open before sewing, or the stitching landed too far from the coil base. Press the coil flat with a cool iron right before you sew, make sure it’s loaded into the groove of the foot, and the foot will guide the needle to exactly the right spot.
How do I fix the gap at the bottom of an invisible zipper?
Start your closing seam as close as possible to the last zipper stitch — within 1–2 mm. If a small gap still shows, bridge it with a hand backstitch using a double strand of matching thread, working from the wrong side. It’s completely invisible from the outside.
What length invisible zipper do I need?
Check your pattern — it will usually specify. If you’re drafting your own or the pattern doesn’t say, measure the opening and buy a zipper that’s 1–2 inches (2.5–5 cm) longer. For most dress back openings, a 22 in (56 cm) zipper is standard; for skirts, a 7–9 in (18–23 cm) zipper usually does it.
Can you sew an invisible zipper into a knit fabric?
Yes, and it works well when you set it up correctly. Use a stretch or ballpoint needle, apply stay tape or knit interfacing to the seam allowance before you start, and sew with a very slight zigzag rather than a straight stitch. The stretch in the seam allowance is what causes problems — stabilise it first and the rest of the process is the same as with a woven.