Quick Answer: To sew a hole in pants, match your method to the damage: hand darning for small worn-through spots up to 1 inch (25mm), machine seam repair for separated stitching, a sewn or iron-on patch for larger holes, and free-motion machine darning when you want speed. Most repairs take 15–45 minutes and don’t require advanced sewing skills.
Knowing how to sew a hole in pants is one of the most useful mending skills you can pick up — and it’s genuinely easier than most people expect. A pair of jeans with a blown inner seam or wool trousers with a moth hole doesn’t have to be a write-off. The right fix depends entirely on what kind of hole you’re dealing with, so that’s where we start.
Which Repair Method Should You Use?
| Hole Type | Best Method | Estimated Time |
|---|---|---|
| Separated seam, fabric intact | Machine seam repair | 10–20 min |
| Small worn hole ≤ 1 inch (25mm) | Hand darning | 30–60 min |
| Large hole > 1 inch (25mm) | Patch repair (sewn or iron-on) | 20–45 min |
| Small to medium worn hole, machine available | Free-motion machine darning | 15–30 min |
None of these require you to be an experienced sewist. Seam repair is genuinely beginner-level. Hand darning takes patience more than skill.
Types of Holes in Pants (and Why It Matters)
Picking the wrong method is the most common reason a repair fails within a week. Before you thread a needle, figure out what you’re actually dealing with.
Seam separation vs. fabric tears. A seam separation is when the stitching gives out but the fabric on either side is completely fine — easiest fix there is, you’re just re-stitching. A fabric tear is different: the fibers themselves have ripped, leaving raw edges that need stabilizing before you sew anything.
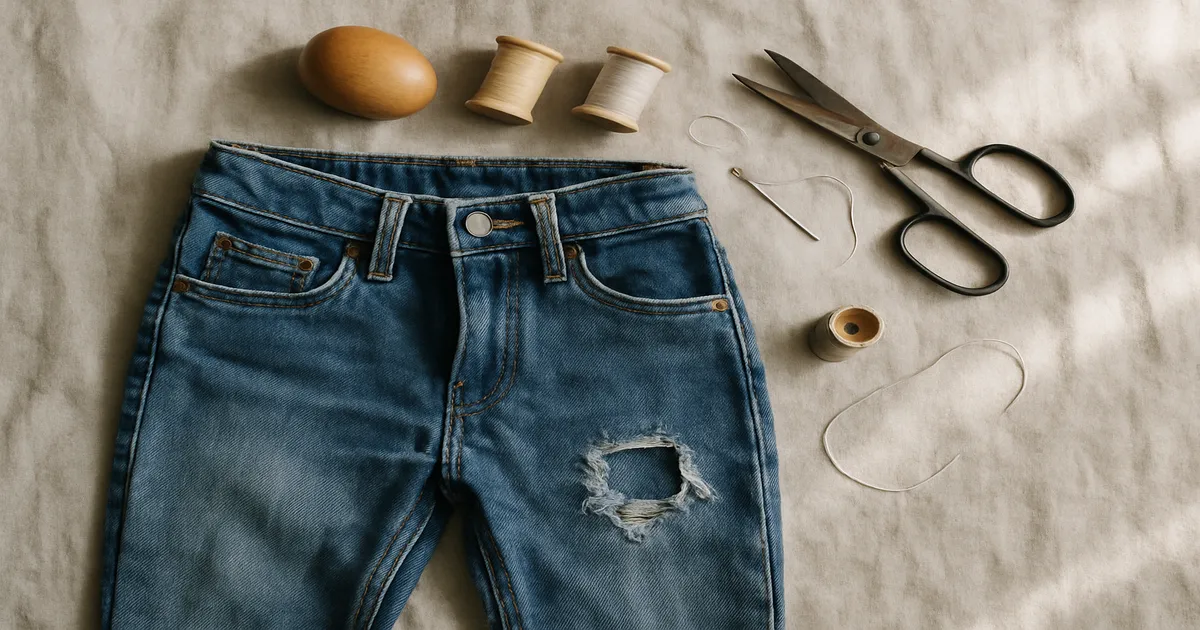
Worn-through fabric. This is the most common type of hole in everyday pants, caused by friction over time. The fabric thins gradually until it disintegrates — no clean edge, just a ragged gap surrounded by weakened fabric. Darning or patching are your only real options because there isn’t enough structure left to simply stitch together.
Moth damage, burns, and other holes. Moth holes tend to be small and irregular, often clustered in wool trousers, and they’re ideal for hand darning. Burns can have cleaner edges, which sometimes makes them easier to patch — but the surrounding fabric may be weakened even if it looks intact, so always extend your repair well past the visible damage.
Woven vs. knit fabrics. Woven fabrics (denim, chino, tweed) have a stable grid structure that darning can replicate. Knit fabrics (jersey leggings, ponte trousers) stretch in multiple directions, so any repair needs stretch built in too. Use knit fusible interfacing, a stretch stitch on your machine, and polyester thread — never cotton — on knits.
Tools and Materials
Thread
| Fabric | Thread Weight | Fiber | Notes |
|---|---|---|---|
| Denim | 40wt or 30wt | Cotton or poly-core | Match indigo carefully — it fades |
| Chino / cotton twill | 50wt | Cotton or polyester | Standard all-purpose works fine |
| Wool trousers | 50wt or fine darning wool | Wool or silk | Natural elasticity matches the fabric |
| Knit / jersey / leggings | 50wt | Polyester only | Woolly nylon in the bobbin for seams |
| Linen | 50wt | Cotton or linen | Linen thread is strongest but harder to find |
Needles
For hand work: a darning needle (sizes 1–5; size 3 is a solid all-rounder), sharps (8–10) for patching wovens, or a ballpoint needle for knits — the rounded tip slides between fibers instead of piercing them.
For machine repairs:
- Denim needle (90/14 or 100/16) for jeans and heavy twill
- Universal (80/12) for medium-weight wovens like chino
- Stretch needle (75/11 or 90/14) for knits — prevents skipped stitches
- Microtex/Sharp (70/10 or 80/12) for fine wool
Other Supplies
A darning mushroom is essential for hand darning — it holds the fabric taut over a dome so your stitches lie flat. A light bulb works in a genuine pinch, but the mushroom is worth owning. For machine darning, a 4–6 inch (100–150mm) embroidery hoop does the same job flat on the machine bed.
Also useful: seam ripper, fabric chalk or water-soluble marker, Fray Check, pressing cloth (always use one on denim — direct iron contact leaves shine marks), small embroidery scissors, and a leather thimble if you’re doing a lot of hand work.
For stabilizers: lightweight fusible interfacing (20–30g/m²) for woven patches; knit fusible interfacing with stretch matching the garment for knit repairs. For machine darning, tear-away stabilizer goes behind the hole; water-soluble stabilizer on top gives the needle a surface to stitch into and simply rinses away afterward.
Method 1: Hand Darning a Small Hole
This method rebuilds the woven structure of the fabric using interlocking rows of stitches. It’s the most durable invisible repair for holes up to 1 inch (25mm), and it’s been done this way for centuries for good reason.
Step 1: Prepare the hole. Trim loose, fraying threads with embroidery scissors — but don’t cut away healthy fabric. You need at least 1/4 inch (6mm) of intact fabric around the entire perimeter. Mark a working boundary just outside that margin with chalk.
Step 2: Set up your darning mushroom. Slip it inside the pant leg and position the dome directly under the hole. Pull the fabric taut — it should feel like a drum skin, not a stretched rubber band. Too tight and you’ll pucker the repair; too loose and your stitches won’t lie flat.
Step 3: Lay the warp threads. Cut about 18 inches (46cm) of thread — longer and it tangles and weakens from friction. Don’t knot it. Leave a 1-inch (25mm) tail and anchor it with your first few stitches. Starting 1/4 inch (6mm) outside the hole, sew parallel running stitches across the hole. Each stitch in the intact fabric should be about 1/8 inch (3mm) long, with the thread spanning freely across the gap. Space rows 1/16 inch (1.5mm) apart and continue 1/4 inch (6mm) past the hole on the far side.
Step 4: Weave the weft threads. Turn 90 degrees and sew rows of running stitches perpendicular to your first pass — weaving the needle over and under the warp threads as you cross the hole. Alternate the over/under pattern on each successive row, exactly like a plain weave. This interlocking is what gives the darn its strength.
Step 5: Finish. Weave thread tails back through several stitches on the underside — no knots needed. Trim tails to 1/4 inch (6mm). The finished repair should feel slightly thicker than the surrounding fabric but lie completely flat.
Method 2: Machine Sewing a Separated Seam
If the fabric is intact and it’s just the stitching that’s given out, this is the simplest repair in the guide — maybe 15 minutes of work.
Turn the pants inside out and find exactly where the seam failed. Check a few inches beyond the visible gap in both directions, because seams often weaken past the opening. Press the seam allowances flat, and if the allowance has frayed, apply a thin line of Fray Check and let it dry for five minutes before you stitch.
Start sewing 1 inch (25mm) before the point where the original seam failed — you want to anchor into solid existing stitching. Straight stitch at 2.5mm, backstitch for 1/2 inch (13mm) at both ends, and match the original seam allowance (typically 5/8 inch / 16mm on commercial garments).
For high-stress areas like the inner thigh or crotch seam, run a second row of stitching 1/8 inch (3mm) inside the first, or add a narrow zigzag (width 1.5mm, length 2.0mm) alongside the straight stitch. Then serge, zigzag, or pink the raw edges, and press from the inside with a damp pressing cloth. Pressing sets the stitches and flattens the allowance — it’s the difference between a repair that looks professional and one that looks like a repair.
Method 3: Patch Repair for Large Holes
Once a hole is bigger than 1 inch (25mm), or the surrounding fabric is too thin to support stitching, you need a patch.
Iron-on patch : Cut the patch at least 1 inch (25mm) larger than the hole on all sides and round the corners — square corners are the first thing to peel. Position it on the inside of the garment, adhesive side against the wrong side of the fabric. Press for 15–20 seconds with firm, even pressure, lifting and repositioning the iron rather than sliding it. Let it cool completely before touching it. For anything beyond very light use, add a row of topstitching 1/8 inch (3mm) from the patch edge — iron-on patches alone don’t survive repeated washing and friction.
Sewn-on patch: Cut patch fabric of similar weight and fiber to the pants, 1 inch (25mm) larger than the hole on all sides, with rounded corners. The best source of matching fabric is the pants themselves — check interior seam allowances or the hem fold. For woven fabrics, turn the raw edge of the hole under by 1/4 inch (6mm) and press. For knits, skip the fold and apply seam sealant to the hole’s edge instead. Pin or baste the patch behind the hole, then topstitch from the outside around the hole’s edge, 1/8 inch (3mm) from the fold.
After topstitching, sew parallel rows across the entire patch every 1/4 inch (6mm) in both directions, extending 1/2 inch (13mm) into the intact fabric surrounding the hole. This grid distributes stress across the whole patch instead of concentrating it at the edges — and it’s why a sewn patch outlasts an iron-on patch by years.
Method 4: Free-Motion Machine Darning
If you’re comfortable at your sewing machine and want a faster alternative to hand darning, this is it. The result looks slightly different — more textured, almost decorative — but it’s very strong and much quicker once you’ve done it a couple of times.
Drop or cover the feed dogs (check your machine’s manual) and attach a darning foot (also called a free-motion quilting foot). Set stitch length to 0, since you’ll control stitch length by moving the fabric yourself.
Hoop the fabric in a 4–6 inch (100–150mm) embroidery hoop so it sits flat on the machine bed. Baste a small piece of lightweight interfacing or organza behind the hole to give the needle something to stitch into. If the hole is very open, place water-soluble stabilizer on top as well.
Move the hoop steadily in one direction, sewing parallel lines about 1/16 inch (1.5mm) apart across the hole. Rotate the hoop 90 degrees and repeat to complete the woven grid. Keep your movement smooth and consistent — jerky movements create uneven stitch density. As you move outward from the hole into intact fabric, gradually reduce stitching density over about 1/2 inch (13mm). A hard boundary between dense stitching and open fabric creates a stress line that can cause new tears.
Common Mistakes When Sewing a Hole in Pants
Stitching too close to the hole’s edge. The fabric right at the edge of a worn hole is already weakened. Start at least 1/4 inch (6mm) into intact fabric — 1/2 inch (13mm) for high-stress areas like the inner thigh.
Using the wrong thread on stretch fabrics. Regular cotton thread has about 3% stretch. Pull it on jersey leggings and it snaps. Use 100% polyester for any knit fabric, and woolly nylon in the bobbin for seams that need maximum give.
Skipping the iron. This is the step most people skip, and it’s the one that makes the biggest visible difference. Press before you sew to flatten seam allowances. Press after to set the stitches. Two extra minutes, dramatically better result.
Mismatching thread color. Don’t guess from your thread drawer. Take the pants to the fabric store and hold spools against the fabric in natural light — a mismatch that looks fine under artificial light will be obvious outside.
Choosing the wrong method for the hole type. Trying to darn a 2-inch (50mm) hole wastes an hour and produces a weak repair. Slapping an iron-on patch on a tiny moth hole looks lumpy and is overkill. Match the method to the damage — that table at the top is there for a reason.
Frequently Asked Questions
Can I sew a hole in pants by hand without a sewing machine?
Yes, absolutely. Hand darning and hand-sewn patches need nothing but a needle, thread, and patience. For small worn holes, hand darning actually produces a more flexible, natural-feeling repair than machine methods. The main trade-off is time — hand darning a larger hole can take an hour or more.
What is the best stitch to repair a hole in pants?
It depends on the hole. For small worn-through holes, a hand-darned warp-and-weft running stitch grid is the most durable option. For separated seams, a straight machine stitch at 2.5mm with backstitching at both ends. For patches, a topstitching grid in both directions spreads stress most effectively.
How do you fix a hole in jeans without it showing?
Thread matching and fabric sourcing are the two things that matter most. Match thread color in natural light at the store — don’t guess. For patch fabric, harvest a small piece from an interior seam allowance or hem fold for an exact match. A hand-darned small hole with well-matched thread is nearly invisible once the jeans have been washed and worn a few times.
How do you repair a hole in the inner thigh of pants?
The inner thigh is high-friction and high-stress, so the repair needs to be robust. A sewn-on patch with a full reinforcing stitch grid — parallel rows every 1/4 inch (6mm) in both directions — is the most durable option. Iron-on patches alone almost never hold here; the combination of friction and flexing pulls them off within weeks. For smaller worn spots, hand darning works well if you extend well into the surrounding fabric.
Can you use an iron-on patch on the inside of pants?
Yes — that’s actually the correct placement. Iron-on patches go on the inside of the garment, adhesive side against the wrong side of the fabric. Placing them on the outside is a style choice (visible mending), not a structural one. For high-wear areas, always add topstitching regardless of which side the patch is on.